
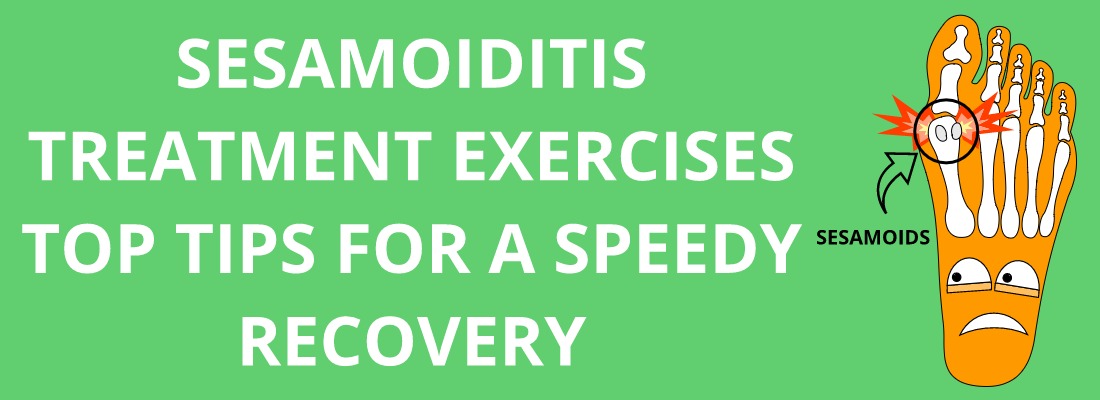
Sesamoiditis Treatment Exercises – Quick And Simple Steps To An Easy Recovery
The best sesamoiditis treatment exercises revolve around strengthening the muscles around the arch of the foot.
Treating sesamoiditis can be an extremely tricky situation. This is because the best way to treat sesamoiditis is through inflammation control which requires a lot of rest.
But there is a way to speed up the recovery process. Check out the simple 3 phase sesamoidits treatment plan mentioned below.
What is sesamoiditis?
Sesamoiditis involves the inflammation of the sesamoid bones, tendons or tissue around the big toe joint.
Sesamoids are two small bones that most people will never hear about, unless they develop sesamoiditis. These bones sit at the base of the big toe joint, right under the first metatarsal.
The sesamoids are floating in nature, just like the knee cap. They are embedded in tendons and act as pulleys for the Flexor Hallicus Brevis (muscle that flexes big toe).
These sesamoid bones sit in special grooves at the base of the first metatarsal bone. They will sit in these grooves so long as the foot is in natural alignment.
Causes For Sesamoiditis
The sesamoids get displaced from their grooves when the foot moves out of alignment. This is especially seen in those with flat feet, forefoot varus, bunions or ankle dorsiflexion problems.
It is also seen in athletes that place a lot of stress on the balls of their feet through repetitive movement patterns. In fact, dancers, as well as those who play tennis, golf, football and basketball are are prone to developing sesamoiditis.
What makes the problem worse is shoes with tapering toe boxes. The problem can get even worse for those with wide feet.
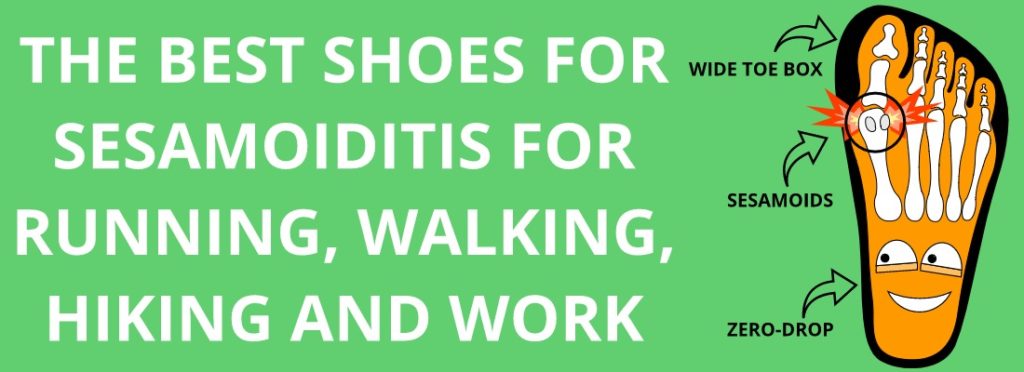
These shoes force the toes out of natural alignment along with the sesamoids themselves.
So much so, that X-Rays show the outer sesamoid sitting under the first metatarsal. Or worse, occupying the space that the inner sesamoid is occupies. This can be cause excruciating pain.
Sesamoiditis Treatment
Although sesamoiditis can be tricky to heal, the concepts used for healing are extremely simple.
Sesamoiditis treatment can be done at home in 3 simple phases.
Sesamoiditis Treatment At Home – Phase 1 (Rest And Relaxation)
Managing inflammation – Phase 1 of sesamoiditis treatment at home involves giving the injury enough time to recover.
This phase simply involves the reduction of inflammation in the area surrounding the sesamoids. Although this sounds simple enough, this phase of sesamoiditis treatment is probably the hardest.
Staying off ones feet requires a certain amount of discipline, no matter how lazy you are.
Phase 1 of sesamoiditis treatment at home:
- Resting the inflammed area – OFFLOAD the injured foot! As mentioned above, this is the simplest step in the 3 phase program, and certainly not the easiest. But it is the basis of sesamoiditis treatment. Giving the sesamoids enough rest reduces inflammation and swelling in the area, thus giving them time to recover. I cannot stress this enough, you will have to take complete pressure off the affected foot for a minimum of 1 full week. Some may require up to 3 weeks of offloading the injured foot, depending on the severity of the injury. There are several other things you can do to ensure a speedy recovery, but reducing inflammation is of utmost importance. Take the maximum required time off, you won’t regret it.
- Icing the sesamoid bones – Icing the inflamed area is also extremely effective when it comes for treating sesamoiditis. This reduces inflammation and must be done several times a day. Make sure to place the ice pack gently over the inflamed area for no more than 15 minutes at a time. Repeat this 3 to 4 times a day. Make sure to end the sesamoiditis treatment exercises mentioned below with the ice.
Sesamoiditis Treatment Exercises – Phase 2 (Strengthening The Arches For Better Posture)
If you have sesamoiditis, you need to understand that;
- If your big toe is not in alignment with your first metatarsal, then your sesamoids aren’t going to be in natural alignment either. Sesamoid bones shift out of place because bio-mechanical integrity of the foot has been compromised. Patients with sesamoiditis usually also have have flat feet, bunions, have limited ankle dorsiflexion and tend to overpronate.
- Having weak arches puts extra pressure on the sesamoid bones as the foot has the tendency to fall inward.
This is what also makes sesamoidits tricky to heel. Hence strengthening the arches of the foot and restoring bio-mechanical integrity will speed up recovery and minimize re-injury.
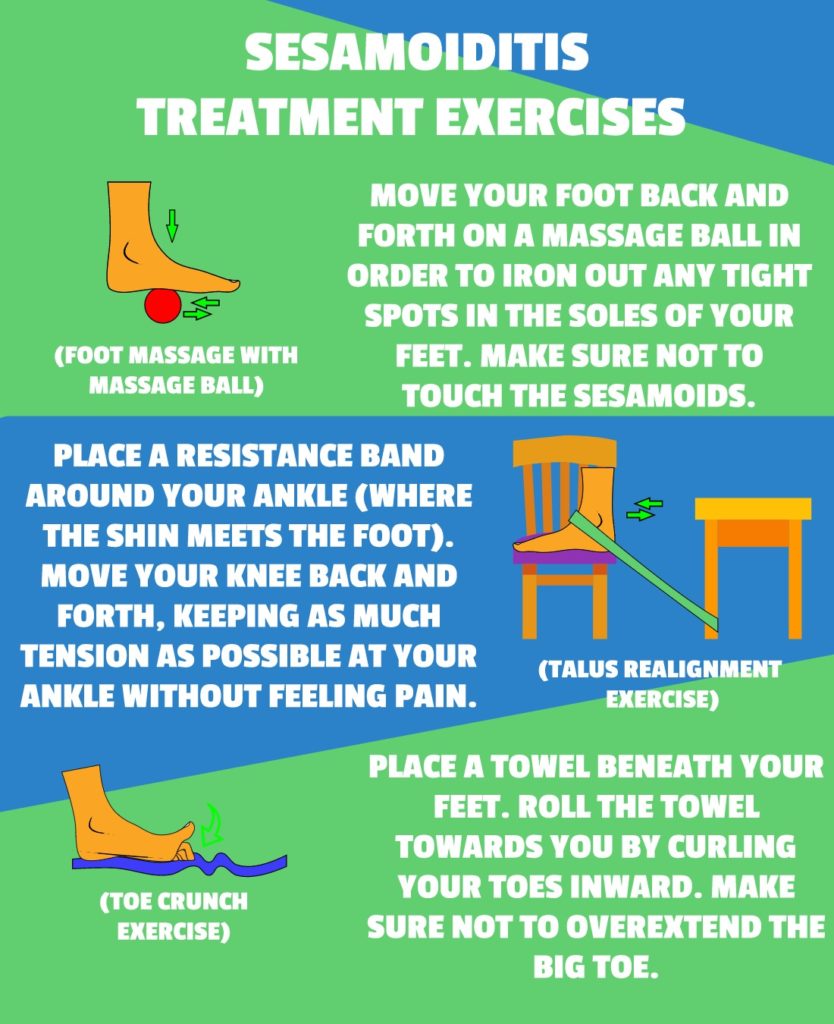
- Foot Massage With Massage Ball – Our feet take a thrashing throughout the day. Because of their location, sesamoid bones sometimes receive very little blood supply. Massage drastically improves blood supply to the sesamoids. The easiest way to this this is by placing a massage ball under your foot. While being seated, gently roll your foot over the ball, making sure not to touch your sesamoids. As you roll your foot over the ball you will feel tight spots in the arches of your feet. Release these tight spots by applying more pressure with the ball by slowly moving it back and forth. You will eventually feel the knot go away (it may not happen on the first attempt). Doing so will improve blood circulation to the sesamoid bones, which will drastically improve recovery time. Perform this exercise several times a day. Especially before and after your sesamoiditis treatment exercises are over.
- Talus Realignment – As mentioned above, limited ankle dorsiflexion is another reason for overloading the sesamoid bones. An anterior shift in the talus limits dorsiflexion and causes a domino effect doen the kinetic chain. This means the talus then pushes down on the first metatarsal through the navicular and cuniform bones, thus irritating the sesamoids. Hence, improving ankle dorsiflexion will reduce pressure on the sesamoids. To perform this exercise, tie a resistance band to the bottom of a bed post or the leg of a heavy desk. Place your foot inside the resistance band as shown in the figure below. Then simply place your foot on an elevated surface like a chair, making sure that there is enough resistance on the band. You want to feel a pull at the point where your tibia (shin bone)meets your foot. Make sure to align your ankle with your knee. Then move your knee back and forth, to the point where your heel is just about to lift off. Don’t let the heel lift off the elevated surface at any point. Make sure to perform at 2 sets of 15-20 repetitions on both legs.
- Toe Crunches – Toe crunches are an excellent way to build the arches of the foot. Make sure to perform this exercise in a seated position. To perform this exercise, place a towel on the floor in front of you. Then place your foot on the the towel and proceed to curl the towel underneath your foot. Repeat with the other foot for a total of 3 sets each. Make sure to perform this exercise at least 2 times a day. Note: It is important not to lift your big toe too much when performing this exercise. It could lead to inflammation. While it might be necessary to lift the big toe slightly, do not over extend. Perform this exercise in a controlled manner.
Taping The Toe For Sesamoiditis – Phase 3
Taping the toe for sesamoiditis is simple, effective and affordable. This relieves a lot of stress in the injured foot. It beats wearing a cast all the time and can be easily out on and taken off at anytime. For more on how to tape the toe for sesamoiditis, check out this article on sesamoiditis taping.
Shoes And Orthotics For Sesamoiditis
On completing the minimum rest period mentioned in Phase 1 of sesamoiditis treatment you can consider loading your injured foot.
You can effectively offload the sesamoids by wearing specialized orthotics and the right type of shoes.
This will reduce the risk of re-injuring the sesamoids and will help you move about pain free.
- Eliminating pressure from the sesamoid bones through custom orthotics – To offload pressure from the sesamoid you will need to use custom orthotics. These are also called dancers pads. The dancers pad has a small cut out around the sesamoids which help relive pressure when walking or standing. While there are several types of dancers pads on the market today, they come with major design flaws. All feet are not made equally, and generic dancers pads assume that all feet are the same. These pads come with pre-cut “sesamoid wells” that are guaranteed not to fit your feet. This is why I highly recommend getting metatarsal pads like the DR JK- Ball of Foot Cushions from Amazon. While they are not made specifically for sesamoiditis, I use them because they will not slip around in my shoes like dancers pads do. You will need to make a slight modification to their design and this is what makes them perfect for sesamoiditis treatment. To make these modifications, wear the metatarsal pad and mark the area around your first metatarsal joint. Then proceed to cut out the marking from the pad. This will create a “well” in which your sesamoids will sit when standing, walking or running. It will relieve pressure from the 1st metataral and transfer it to the 2nd, 3rd, 4th and 5th metatarsals.
- Shoes For Sesamoiditis – Wearing the right shoes will greatly reduce the risk of re-injury. You will need to get footwear that has a wide toe box. This will ensure that your toes are not being pinched together. Another feature you will need to look out for is a flat shoes. Shoes that have even a slight heel, transfer pressure away from the heel, towards the ball of the foot. Thus increasing irritation and inflammation of the sesamoids. Toe springs in shoes also contribute to sesamoiditis. They stretch the toes such that our natural fatty padding under the ball of the foot is not enough to cushion the sesamoids from impact.
Surgery – Phase 4
In some cases surgeons can recommend surgery. In which case the doctor will decide whether to completely remove the sesamoid bone.
The doctor can also decide to shave it down also known as sesamoid planing. Planing involves filing down of the sesamoid bone in order to reduce its size.
Removing one sesamoid bone leaves the other one to function as a pulley. But removing both sesamoids make the toe flexor dysfunctional, causing the big to to lose natural alignment.
Surgery is always a last resort.
Sesamoiditis Healing Time – How Long Does It Take For A Sesamoid Fracture/Injury To Heal?
People often ask – How long does sesamoiditis take to heal?
Well, a sesamoiditis injury can take a long time to heal. Recovery time varies from 3-4 weeks to a couple of months or more.
There are cases of sesamoiditis taking as long as 8 months to heal.
Conclusion:
The treatment of sesamoiditis can be tricky. But enough rest and a structured exercise routine can ensure a quick recovery.
The sesamoiditis treatment exercises mentioned in this article will have you walking pain free in no time.
Sources: